Would you like to find out more why wood is such a beautiful material for a bicycle, how we tested it or are you curious about what the production process looks like?
Advantages wood
It may seem obvious that a bicycle is made of aluminum, carbon, steel or even titanium. But it may surprise people how suitable wood actually is as a base for your bicycle!
Design a bicycle that will last for years? It needs time and patience during the stage of development. To construct a product correctly, a number of ingredients are needed: technical knowledge, experience, adjustment and testing.
Before this wooden bicycle can actually come on the market, there are a lot of phases that have been passed. Starting with the idea, drawing, choosing materials, producing, testing, adjusting, etc.
It may seem obvious that a bicycle is made of aluminum, carbon, steel or even titanium. But it may surprise people how suitable wood actually is as a base for your bicycle!
Vibration decreasing
In with carbon fibre (and aluminium) wood has the property to reduce the vibrations. Normally, road bikes have a rigid front fork. That is one reason there is a big advantage for wood as a medium to use it for bicycle frame builds to improve comfort. Vibrations arise during the contact with pavement and will be passed on to the driver through the wheels, fork and frame. The intensity of the vibrations will be reduced mostly with a frame of wood.
Stunning looks
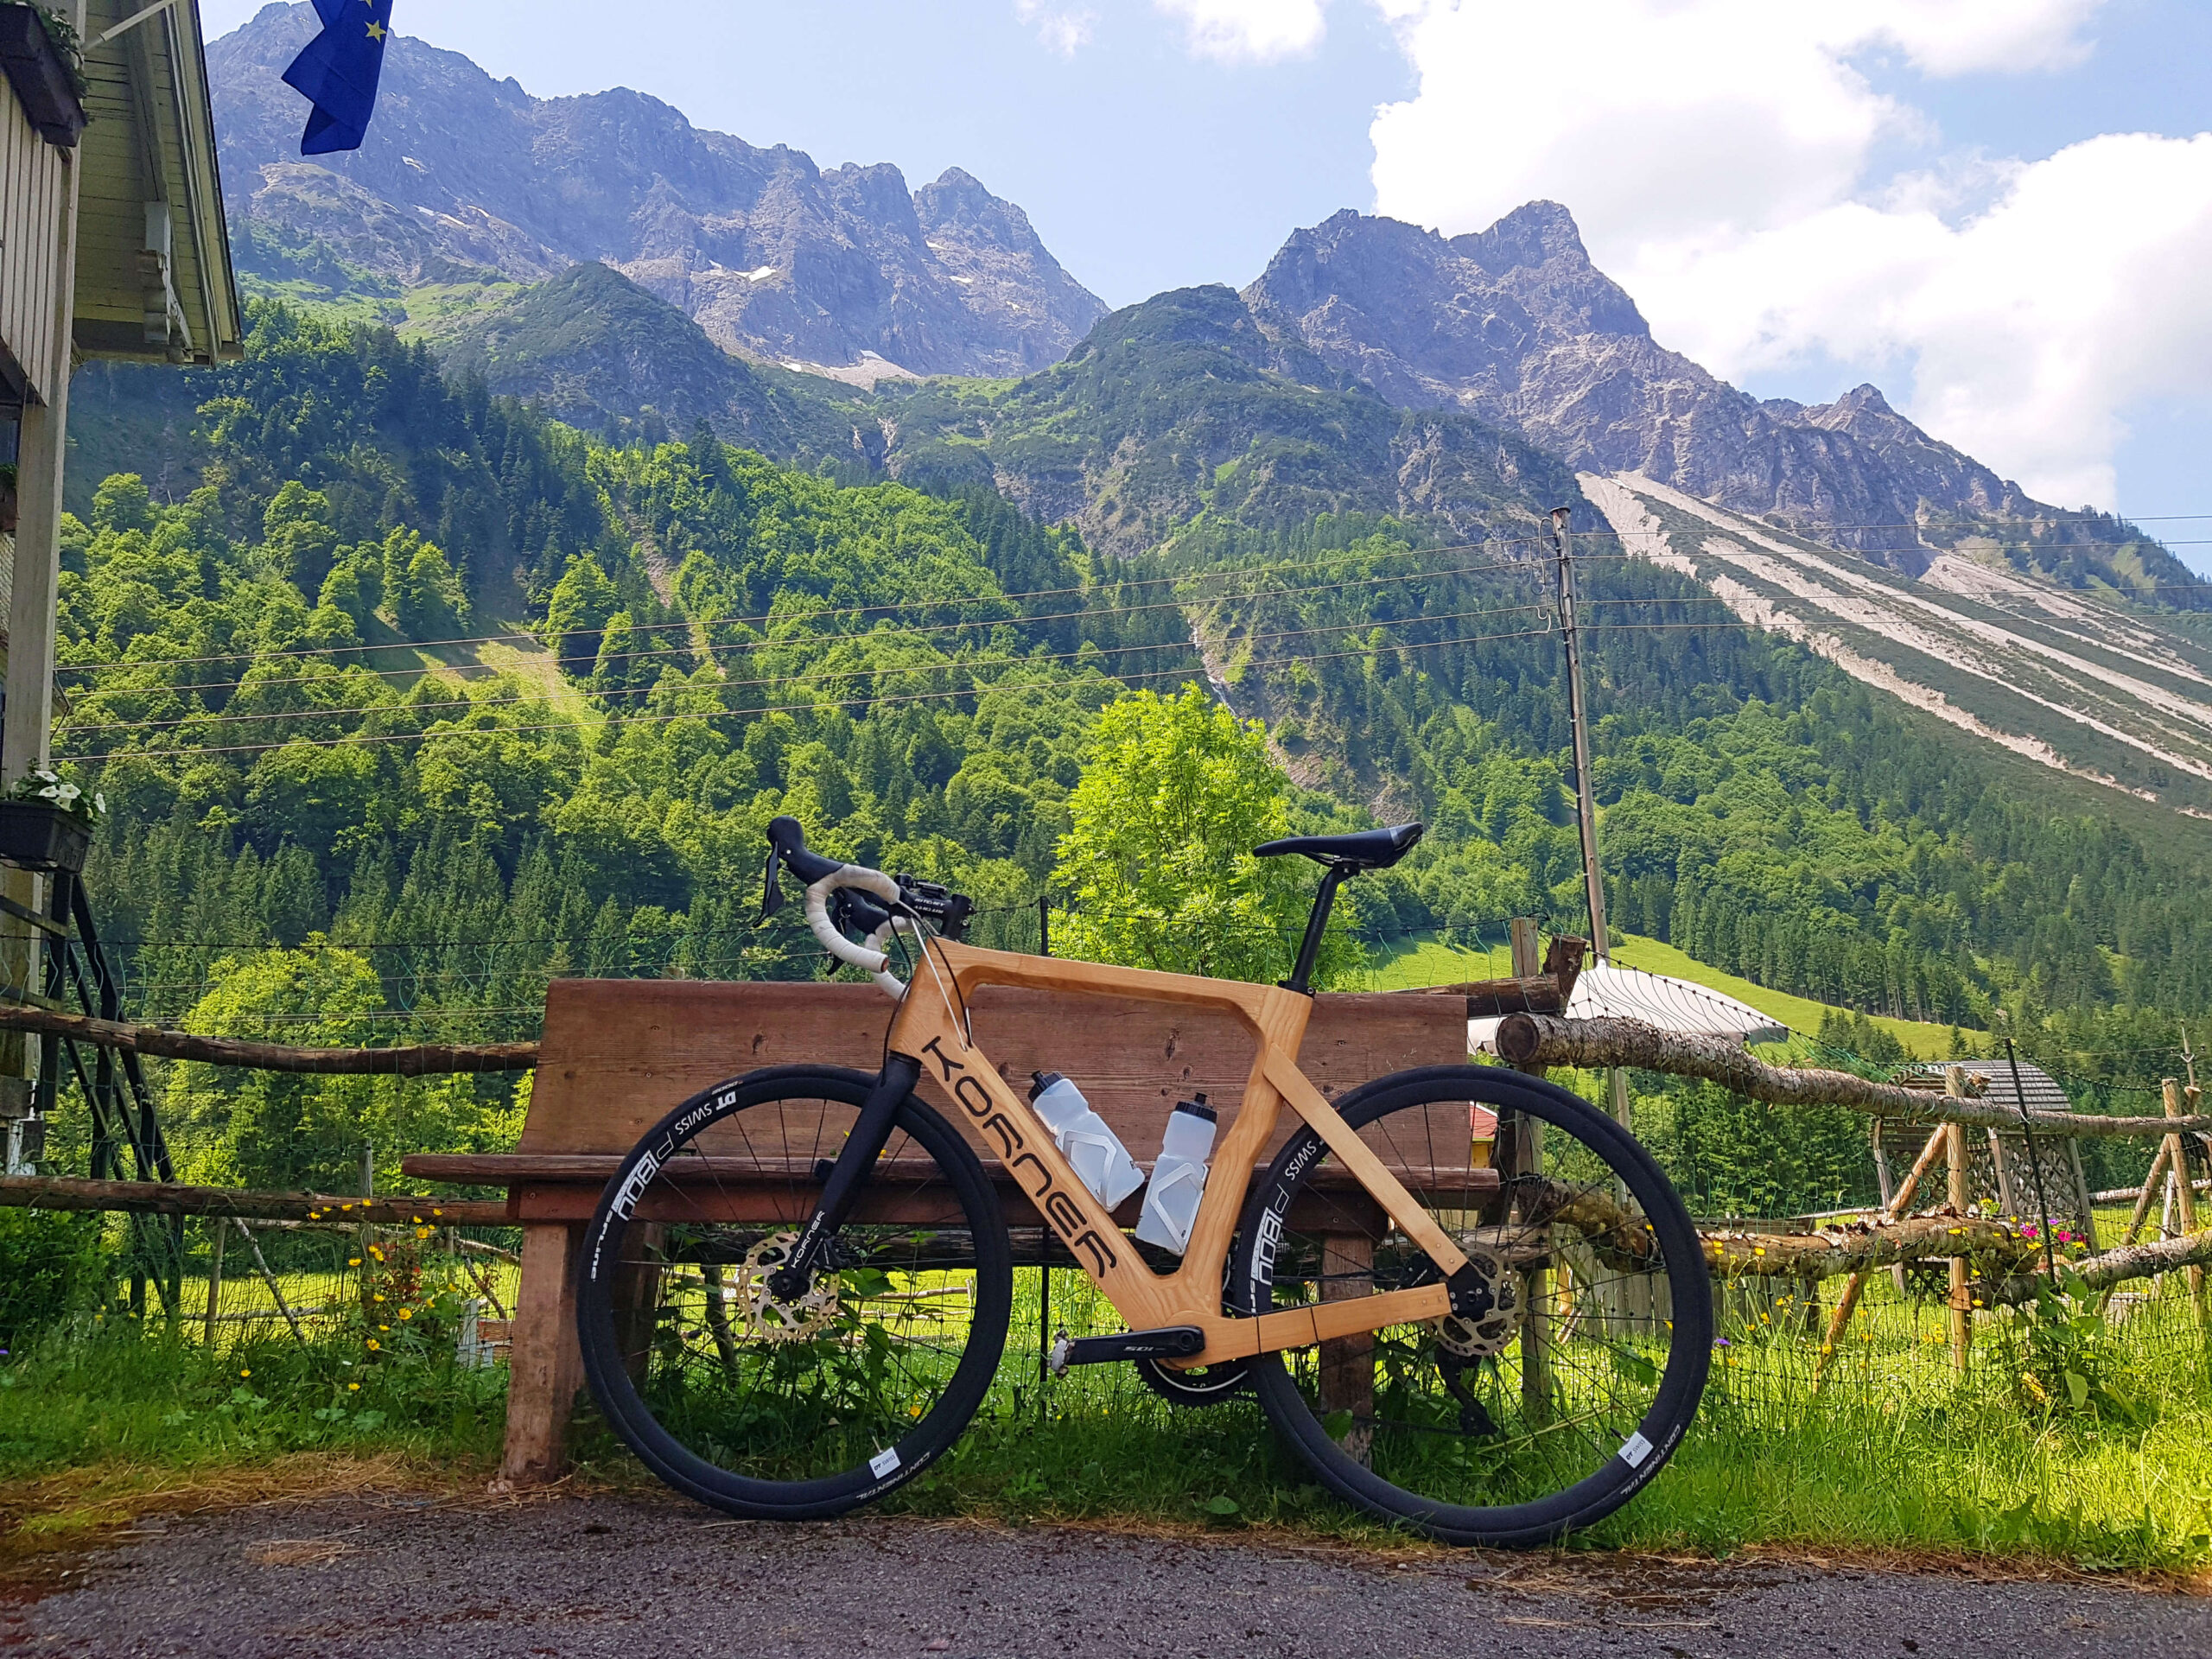
Off course there is this bike for the looks. In the current street scenes there is almost zero chance to meet a bike of wood. A road bike is an even more rare object. Every bicycle is unique and has her own natural beauty from the grain of the material.
The strength
Without making compromises for a heavy frame weight, it is possible to get the same frame strength as possible with usual bicycles of aluminium and carbon fibre.
To make this more clear it will be explained with support of some illustrations.
First the different values of the different materials to have a good referention to each other. Important properties are at least the tensile strength, mass density and the young’s modulus.
Wood (ash)¹
Aluminium (7005 T6)²
Carbon fibre³
Tensile strength (N/mm²)
145
350
600
Density (kg/m3)
0.7
2.78
1.6
Modulus of elasticity (N/mm²)
12500
72000
70000
If you look at it, you can say wood is a weak material. If you have two tubes (wood and aluminium) with a wall thickness of 1 millimetre you will be right. But that conclusion was made to soon. In the tube comparison it means the tube of wood is much lighter. To get the same weight as the aluminium tube it is possible to increase the wall thickness. By increasing the thickness you get almost the same strength and weight as the aluminium tube.
There is an aluminium 7075 T6 tube 30×1 with a length of 500 millimetre, which has a weight of 126 gram.
To reach the (almost) same weight with a tube of ash wood it is necessary to increase the wall thickness from 1 to 4.5 millimetre.
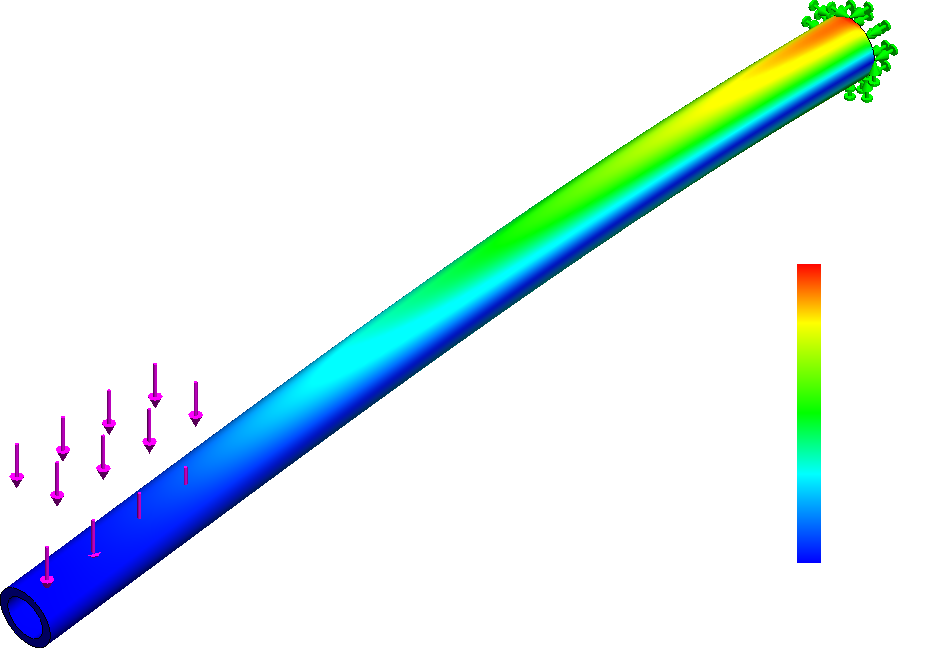
When we convert these values to a simulation, it does lead to the following. There is made a simulation of tubes with the earlier noticed specific sizes and values and used a force of 250N (around 25 kilograms) distributed on the surface 100mm around one end. The other end is fixed.
The occurring stress in the red areas on the end are around 58.7 N/mm² with an allowing limit (before breaking) of 145 N/mm².
The displacement in the red area in comparison with the original place is around 23.6mm.
Now we are going to compare this with aluminium 7075 T6 and a wall thickness of 1 mm and so a mostly equal weight in an identical setup.
The aluminium tube reaches a stress level with 189 N/mm² compared to a maximal stress level (breaking point) of 350 N/mm².
The visual displacement on the end is around 12.9 mm and with that decently less than the thicker wood tube. This says something about the stiffness. However, reaching the same stiffness is possible when the dimensions of the wood tube change (and having the same weight).
We take a tube with a diameter of 40 mm and 3.1 mm wall thickness.
You can see the displacement is only 11.6 mm (also the stress is getting less with 38.4 N/mm²). That means the displacement is less than the 30×1 aluminium tube.
The conclusion is that the strength for wood gives about the same results as aluminium, as long you use the right wall thickness without making compromises with the weight. Reach the equal stiffness with wood in comparison with aluminium is also possible, however it is important to use the right tube diameter.
This explanation is only as an example to make things clear. We are not responsible for any inaccuracies.
Design a bicycle that will last for years? It needs time and patience during the stage of development. To construct a product correctly, a number of ingredients are needed: technical knowledge, experience, adjustment and testing.
ISO 4210-6:2023
4.1 Impact test: falling mass
Passed
4.2 Impact test: falling frame
Passed
4.3 Fatique test: pedalling forces
Passed
4.4 Fatique test: horizontal forces
Passed
4.5 Fatique test: Vertical force
Passed
This is how it went
In this video you can see random moments during this ISO test and see how the bicycle keep standing. The tests together simulates 10 years of good use.
We had done this too
Trial and error
You want the first bike to be right from scratch. Development often takes more time than you initially thought. To produce a bicycle at a professional level, conditions are imposed on many areas. Into practice, this mainly means that different prototypes were built to take the product to the highest level.
Get to know the material
Wood is quite a special material. It is natural and the core of the structure remains intact during processing. Many bicycle frames are made of aluminum. An isotropic material. Wood is an anisotrope. A material that technically does not have the same strength in every direction. For a strong construction of the frame, it is necessary to take this into consideration. Where do you use the wood and how?
Grab the cobblestones
Let’s be honest, riding over cobblestones isn’t really that good for a road bike. And of course it’s not fun either (not everyone agrees on this). However, it is so incredibly rough that it is good to know and learn how a bicycle reacts to it in different ways.
Endurance trip to Austria
Before the bike underwent an official ISO test, it was a big test to take the bike on the road to get acquainted with different environments and roads.
Before this wooden bicycle can actually come on the market, there are a lot of phases that have been passed. Starting with the idea, drawing, choosing materials, producing, testing, adjusting, etc.
What makes realising an wooden bike possible?
All starts with the idea, make it physique by making a design of this thought image. A design can through drawing a sketch on the paper but is getting really shape when making a 3D/CAD model. On the computer the model is getting visual realized already. From a raw shape to a well detailed bicycle concept and taking account into the mechanical parts (derailleur, bracket), wheels and off course the size of the frame itself.
If everything is right, it will be separated in different stand-alone parts which will be all glued together later to a whole wooden road bike again. This is because it is possible to make a cut on the inside which is necessary to reduce the weight and also to process the internal lines for shifting and braking.
These parts will be sorted together in an efficient way for milling out. To realise this there is a program written based on the 3D model made earlier. When the program is made in the right way it can be loaded in the CNC milling machine to execute it. So far everything is realised only with the computer.
And then this...
Milling all different parts
This program can be loaded onto the CNC milling machine, the raw wood will be clamped and the correct mill will be mounted. The program can then be started and depending on the size and quantity of parts, the machine will create the same shape as the 3D model visible on the computer. For detailing, we usually do several programs with different mills per model.
Bonding all parts together
All parts will be treated first so that everything fits together nicely before it is coming together. If everything fits nicely, the inside is covered with an epoxy coating to protect the wood from moisture. After curing, the parts are one now homogeneous unit. The aluminum parts are also integrated with this process so that the bottom bracket cups, headset bearings, seat post can be mounted on the frame later.